The plans of a property
This page concerns organisations running Graphlake.
If your organisation is still on Abyla, your screens are described in Platform - Plans tab (Model) and Model.
What it is for
The Plans tab lets you view the digital models of your property: this is the Graphlake interface.
It also works for properties that have not been modelled — the screen then adjusts to what is available.
The interface reads in two or three parts, depending on whether a digital model exists:
| Part | What you find there |
|---|---|
| On the left — the tree | The whole physical composition of your property |
| In the middle — the plan | Only present if you have a digital model |
| On the right — the information panel | The characteristics of the selected element, whether picked in the tree or on the plan |
Video tutorial, 1 min 43: opening a plan and reading the data it carries.
The screen explained
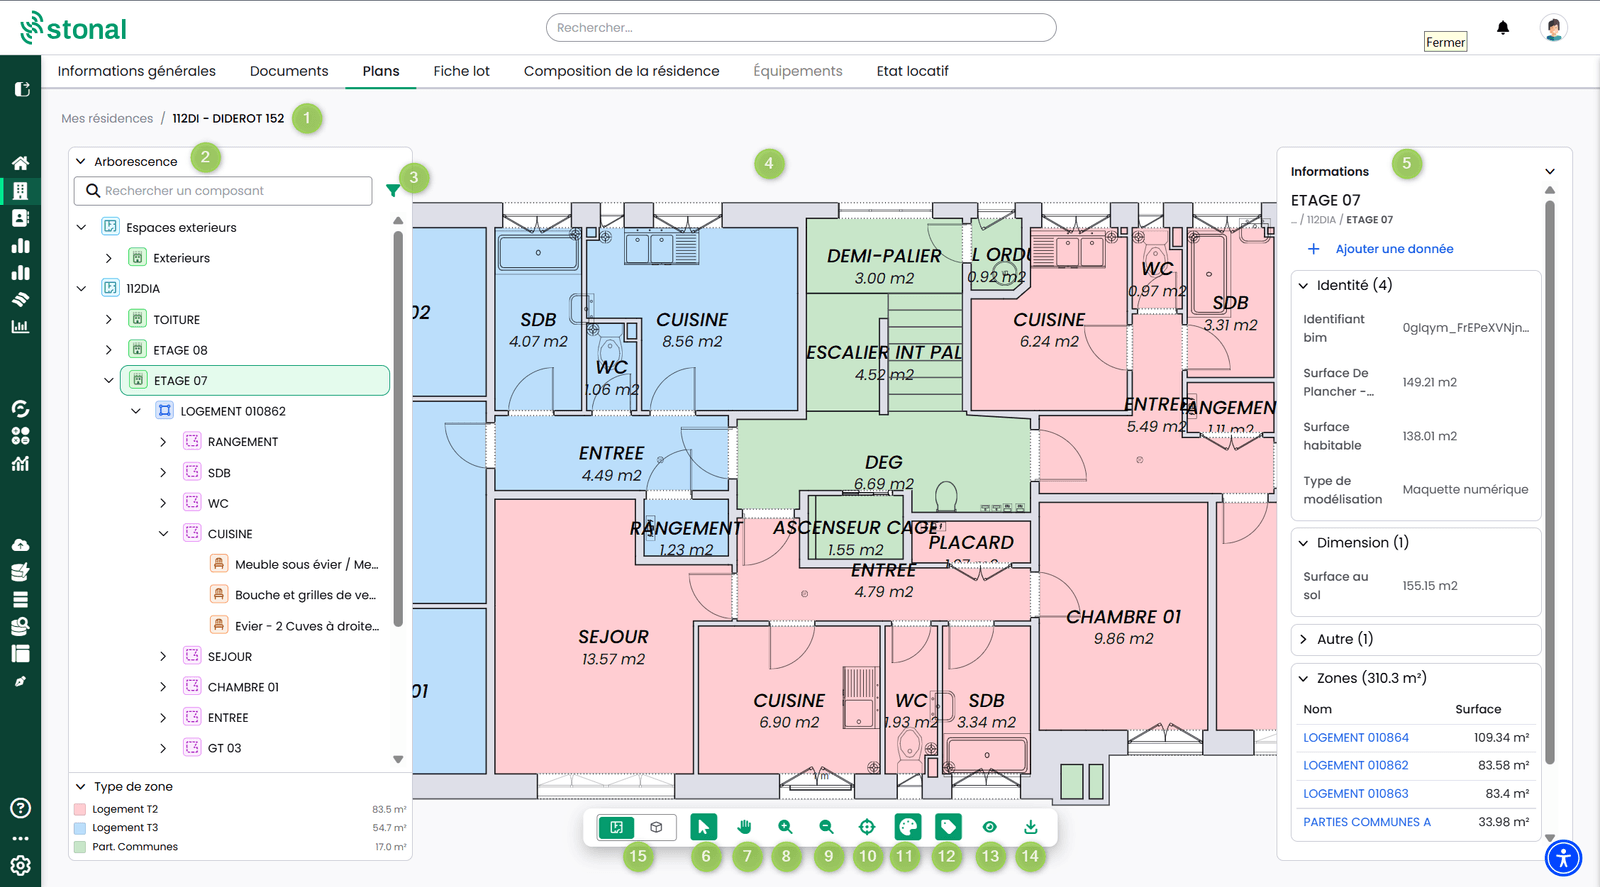
The screen has five areas:
- Breadcrumb — locate the property or building, and move up a level.
- Tree — the breakdown of the property. Expand and select an item to zoom onto it.
- Search — find an item (site, building, floor, zone, room, equipment) by type, name or code.
- Plan — the viewing area.
- Information panel — all the information of the selected item: renewal date, brand, equipment type…
The toolbar, at the bottom of the plan, follows the numbering on the capture:
| Marker | Tool | Use |
|---|---|---|
| 6 | Selector | Choose what you select: equipment, rooms… |
| 7 | Cursor | Move the plan — right-click also works |
| 8 | Zoom in | Ctrl + scroll wheel also works |
| 9 | Zoom out | |
| 10 | Recentre | Bring the plan back to the centre of the view |
| 11 | Themes | Colour the plan by a criterion |
| 12 | Labels | Show the name and area of spaces on the plan |
| 13 | Overlays | Show or hide certain elements: plots, networks, areas… |
| 14 | Download | Get the plan as a PDF |
| 15 | 2D / 3D | Switch to three dimensions, when the 3D model is available |
Switching to 3D
Button 15 switches the view to three dimensions. It is only active on properties whose 3D model is available.
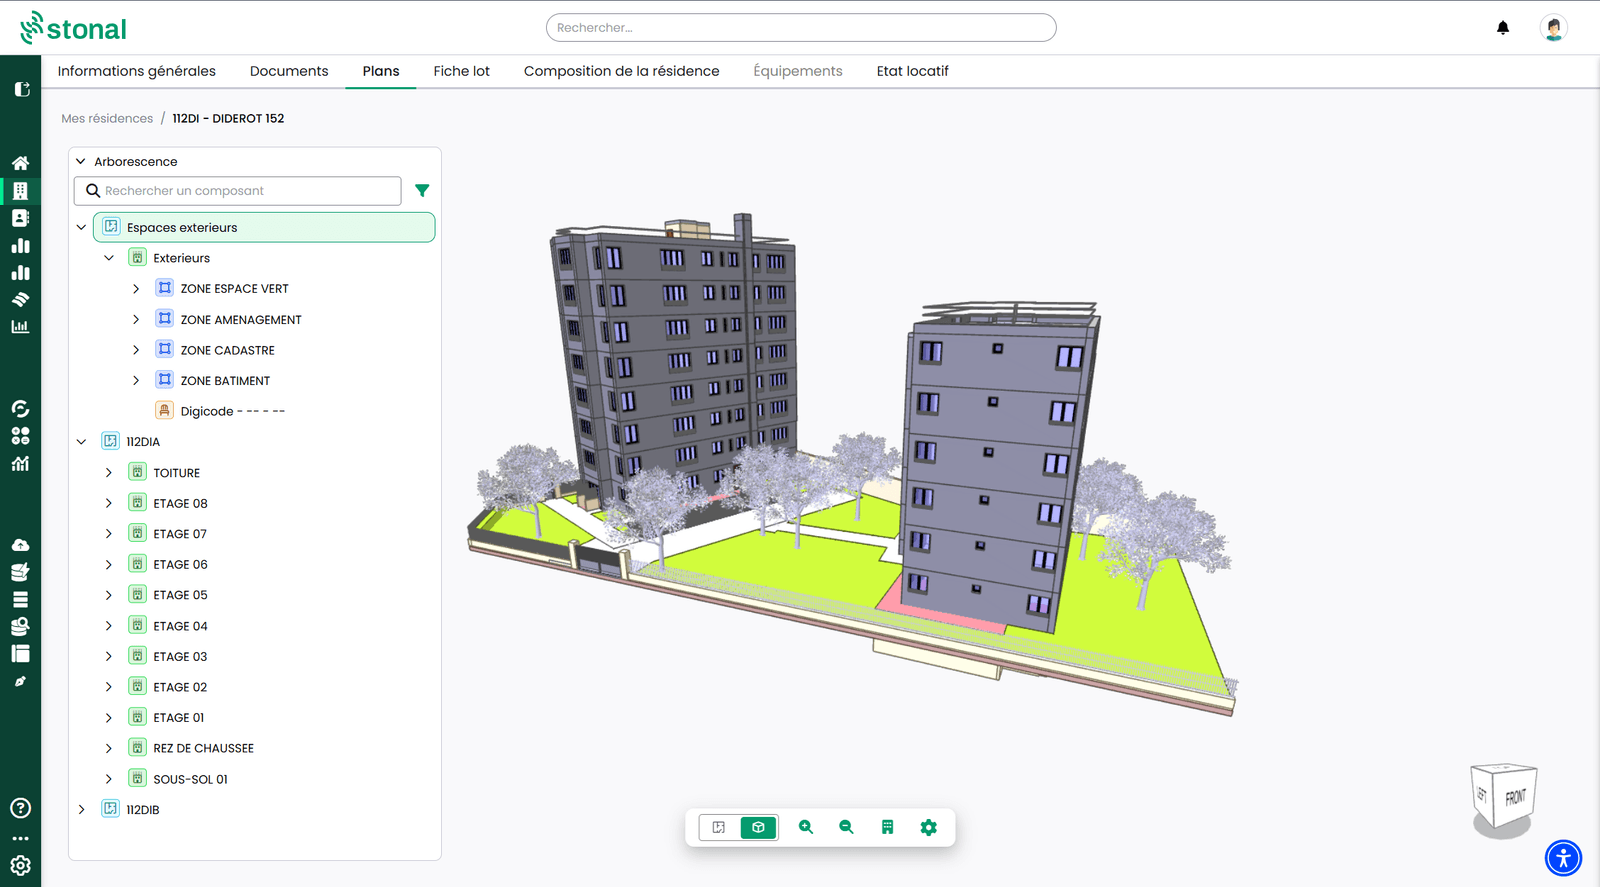
The 3D view is handled with the mouse: left-click to rotate the model, scroll wheel to zoom. The orientation cube, at the bottom right, tells you which side you are looking from and lets you return to a specific face. The toolbar there is reduced to the functions that make sense in 3D.
Video tutorial, 1 min 33: producing the plan of a dwelling or a floor, to scale.
Step by step
Open the plans of a property
Video tutorial, 2 min 39: moving around, zooming, recentring, finding an element.
- Open My properties in the left-hand menu.
- Find the property or building you want.
- Click the Plans tab.
The digital model is displayed directly in the platform.
Colour a plan by theme
- Choose the level in the tree.
- Open the Plans tab.
- Choose the theme and apply it.
The plan is coloured and a legend appears — you can move it, or zoom in on it. For example: vacant dwellings, or dwelling types.
Site areas, for instance, only appear if you have selected the site.
Video tutorial, 55 seconds: green spaces, parking and circulation areas, by theme.
Create your own theme
Beyond the themes supplied as standard, you can build your own, based on any property of your components.
- In the toolbar, click Themes.
- Click the + button.
- Give your theme a name.
- Choose the component it applies to: dwelling, room, equipment…
- Choose the property the colouring is based on.
- Click Save.
Each value of that property is then given a colour automatically. Choosing the colours yourself is not possible yet.
To modify a theme you have created, click the pencil next to its name. To delete it, click the bin.
Creating and modifying custom themes requires the Plan settings permission. If you cannot see the + button, speak to your administrator.
View the information of a component
Choose the level, then click the component. Expand the property groups: condition, dimensions, renewal date…
Correct a piece of information
From the information panel, click a value to change it. To record a value that is not there yet, use the "Add data" button.
Previous values — entered by other users, or brought in by another system — are not deleted. They are simply no longer displayed directly.
These actions depend on a data modification permission, so you may not have access to them. If you need it, speak to your usual contact.
Search for an element on the plan
Three routes lead to a piece of equipment, depending on what you already know about it:
- the tree, if you know where it sits — expand down to it;
- the search bar, by typing its name or its code: the most direct route when you do not know where it is;
- the filter, to the right of the search bar, to narrow the list down.
Automatically calculated areas
Video tutorial, 1 min 07: living area, rooms and outbuildings, read from the plan.
Stonal calculates three areas at each level, aggregating from the bottom up: space → floor → building → group → zone → unit.
| Area | What it measures |
|---|---|
| Floor area | The raw geometric area, with no usage rule |
| SHAB — habitable area | Habitable spaces at least 1.80 m high; excludes conservatories, porches and cellars (Boutin law reference) |
| SDP — gross floor area | Enclosed, covered spaces at least 1.80 m high; excludes plant rooms, technical areas and covered outdoor spaces (planning code reference) |
They do not replace an official measurement by a certified professional (surveyor, chartered surveyor) and have no legal value.
Known limits: the 10% deduction for multi-dwelling buildings is not applied, so gross floor area may be overstated by around 10%. Heated conservatories and porches, and converted cellars, remain excluded. Plant rooms are excluded even in a single-family house.
Good to know
- To report an anomaly on a plan or request that a plan be added, go through your internal contact.
- To update your portfolio, we recommend two routes: going through the Query tool — via a CSV import, for instance — or scheduling a field survey with our mobile app EDIT.
See also
- General information for a property
- Works Plans — plans feed the calculation