General information for a property
What it is for
This is your property's identity card: where it is, what it is made of, and every piece of data you track about it.
It is the first tab of the property page. You get there from My properties or from the search bar.
The same tab exists at building level. Two routes lead there: select a building directly from the previous page, or click a building shown in the Composition area.
Video tutorial, 57 seconds: address, areas and vacancy, gathered in one place.
Before you start
Consulting the information is available to every user within your scope. Modifying or adding a piece of data, and adding a building, however, depend on the permissions you have been granted, so you may not have access to them. If you need them, ask your internal contact.
The screen explained
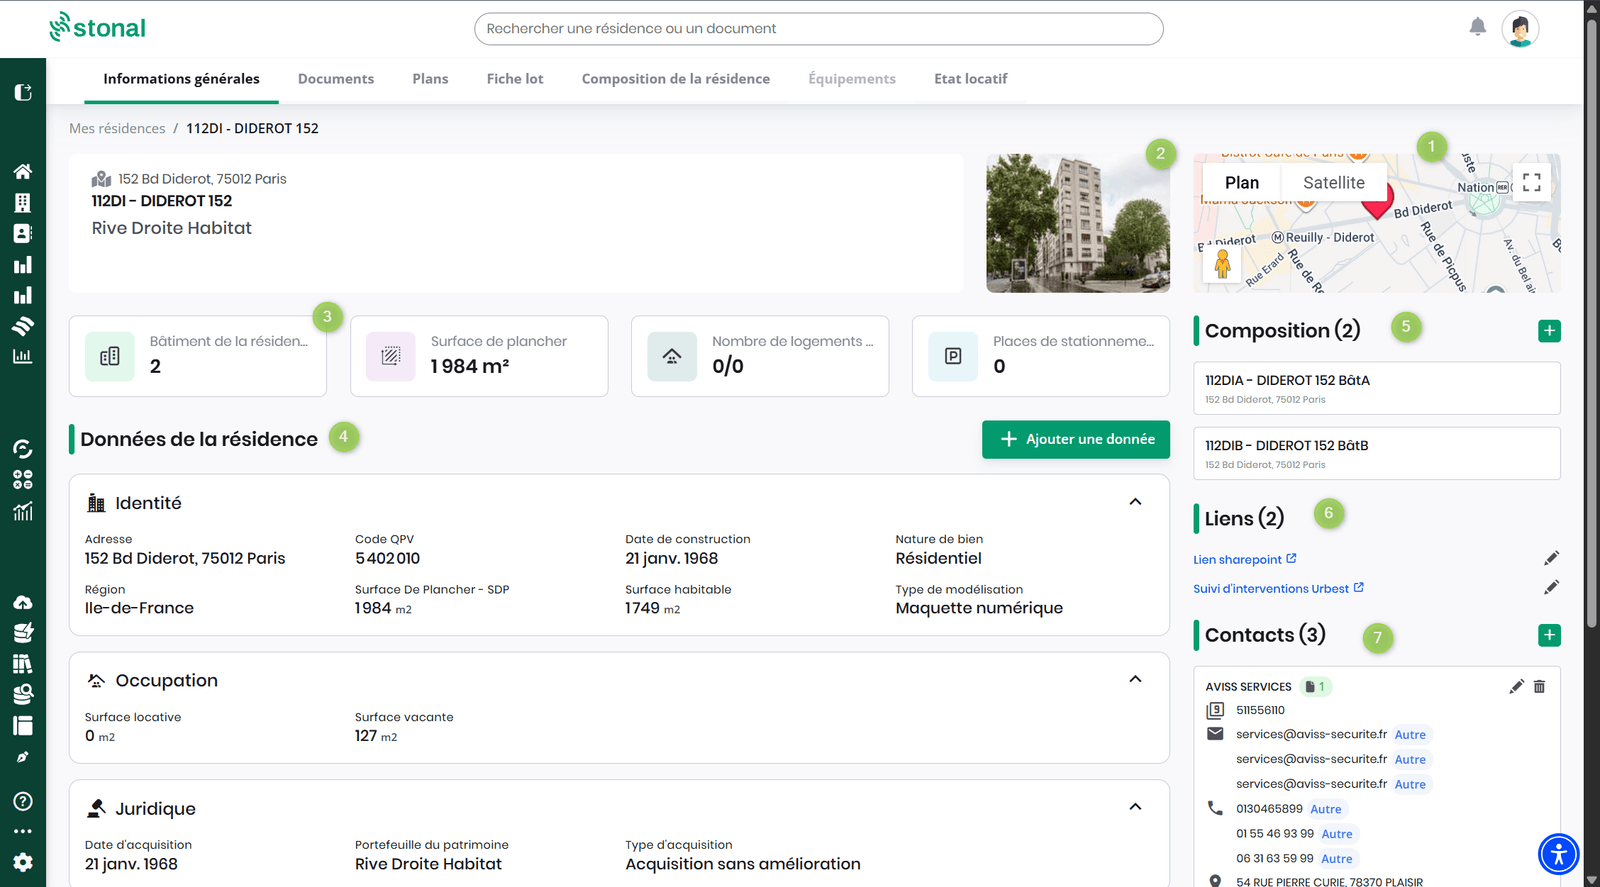
The tab reads in seven areas:
- Geolocation — the position of the property on a map, in map or satellite view.
- Photo — usually the façade of the building.
- Key information — what appears here is configurable per organisation. Access to the configuration page depends on the permissions you have been granted; it sits in the menu, under Settings › Organisation management.
- Property data — all its data, split across six axes: identity, operation, occupancy, environment, legal, other.
- Composition — the list of buildings in the property.
- Links — shortcuts to your external tools, so you can move from one application to another without leaving Stonal.
- Contacts — the contacts attached to the property.
A link takes you to the Documents tab to consult the documentation for the property or the building.
Step by step
Add a piece of data
- Click "Add data".
- Choose the data type from the list — it contains the data retained by your organisation.
- Enter the value, then confirm.
Modify an existing piece of data
- Click the data you want to correct.
- Enter the new value, then confirm. Data is kept in history: the previous value is not lost.
Add a building
- From the relevant property, click "Add a building".
- Enter the data for its identity card, then confirm.
Change the photo
- From the data page of the property or the building, click the photo.
- Drop in the image you want. Accepted formats are PNG and JPEG.
Add a link to an external tool
Links are shortcuts you create yourself: they save you looking up another tool's address every time.
One step comes first: the property that will carry the link must exist in your property reference data, with the "link" type. Once that property has been created, all that remains is to enter the address of the tool you want to point to.
Add a contact
Two routes lead to the same result:
- from this page, using the + button in the Contacts area;
- from the Contacts & operators module, by creating the contact and then giving it its scope.
The first route is quickest when you are already on the property. The second is preferable when you are creating a contact who works across several properties.
Good to know
If your portfolio data is updated automatically from your management software, avoid the "Add data" and "Add a building" buttons: it may create inconsistencies. Speak to your internal contact.
- The list of available data depends on your organisation's configuration.
- To consult the change history of a piece of data, go through the Checking data application if you have access to it. If not, ask your internal contact for access.
See also
- My properties — finding a property in the list
- Organisation management — choosing the key information shown
- Contacts & operators