Editing the plans and structure of a building
Some of these actions require edit permissions. Only want to view a plan? See The plans of a property.
This page concerns organisations running GraphlakeThe Stonal interface for viewing and managing plans: it is what the Plans tab displays..
If your organisation is still on AbylaPlan management before Graphlake. Its screens are described in the Earlier versions section., your screens are described in Platform - Plans tab (Model) and Model.
What it is for
This page describes what you can change from the Plans tab: create your own colour theme, correct a piece of information carried by a component and keep a building's structure up to date.
Step by step
Create your own theme
Beyond the themes supplied as standard, you can build your own, based on any property of your components.
- In the toolbar, click Themes.
- Click the + button.
- Give your theme a name.
- Choose the component it applies to: dwelling, room, equipment…
- Choose the property the colouring is based on.
- Click Save.
Each value of that property is then given a colour automatically. Choosing the colours yourself is not possible yet.
To modify a theme you have created, click the pencil next to its name. To delete it, click the bin.
Creating and modifying custom themes requires the Plan settings permission. If you cannot see the + button, contact your referent.
Correct a piece of information
From the information panel, click a value to change it. To record a value that is not there yet, use the "Add data" button.
Previous values — entered by other users, or brought in by another system — are not deleted. They are simply no longer displayed directly.
These actions depend on a data modification permission, so you may not have access to them. If you need it, speak to your usual contact.
Keep a building's structure up to date
These actions depend on the permissions you have been granted, so the "Edit" switch or some actions may not appear, or may be greyed out. If you need them, speak to your usual contact.
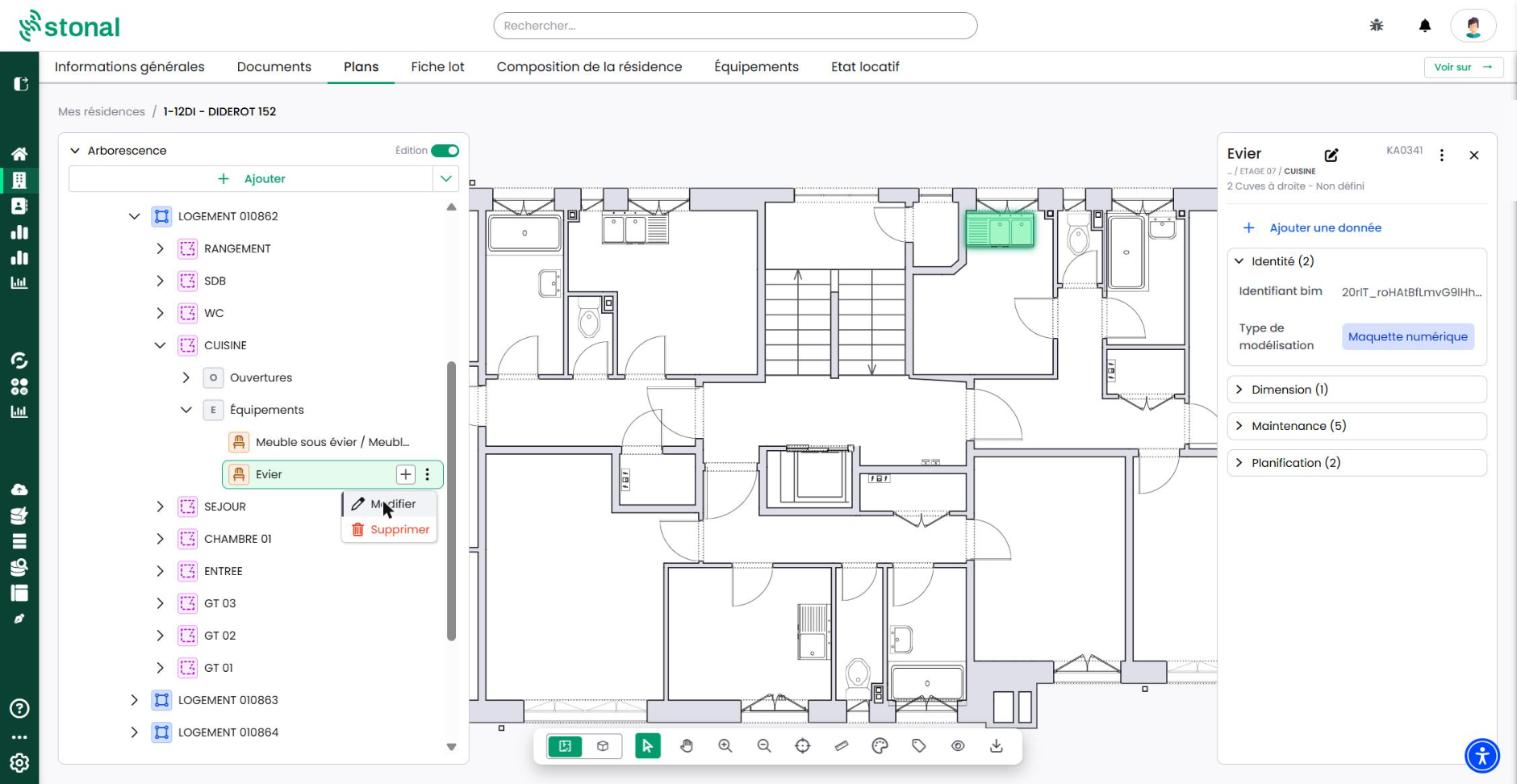
A piece of equipment is missing, or is no longer the right one: you can correct it directly in the platform, without leaving the Plans tab. That is the main purpose of the tree's Edit mode: adding missing equipment and editing existing equipment. For equipment (except wall equipment, such as windows), the building's graphical representation, in 2D and in 3D, is updated automatically.
This mode also lets you create or edit a building's structure (the building, its levels, zones and spaces), including before it is modelled: you can work on a building even before it has a graphical representation in 2D or 3D.
Creating or editing a level, a zone or a space does not change the building's graphical representation in 2D and 3D, if there is one. Only equipment is updated in it automatically. Merging two homes, adding a floor or editing wall equipment: for the graphical representation to reflect it, the digital model must be updated in Revit. If you have a need of this kind, pass it on to your internal contactThe person in your organisation who knows the configuration chosen for Stonal: permissions, access to a module, contents of a report..
Add or edit equipment
- At the top of the Tree panel, turn on the "Edit" switch.
- To add equipment, hover over the row of the building, floor or zone where it is located, click +, then Add equipment. Choose it from the list, sorted by trade, or search for it by name.
- To edit equipment, hover over its row, open the ⋮ menu, then click Edit.
- Turn the "Edit" switch off to return to viewing.
Change the rest of the structure
Still in Edit mode:
- to create a building, use the "+ Add" button, then choose a building;
- to add an element inside another one, hover over its row, then click +:
- on the site: Add an outdoor level, Add an outdoor zone, Add an outdoor space or Add a piece of equipment;
- on a building: Add a level, Add a zone, Add a space, Add a piece of equipment or Add a building at the same level. A zone or a space can therefore be created directly under the building, without going through a floor;
- on a floor: Add a zone, Add a space or Add a level at the same level;
- on a zone (a home, for example): Add a space or Add a zone at the same level;
- to rename or duplicate an element, open the ⋮ menu on its row;
- to change the order of the floors, drag a level by its handle (⠿).
When you create a zone, you can create several at once (they are numbered automatically) and link them to a letting management code: pick an existing unit or create a code. That code is what links the zone to the unit in your letting management. You will find it again in the "Edit zone" window, together with the effective and expiry dates.
See also
- The plans of a property: view, search, measure and export
- Equipment
- Running a field survey with EDIT: report a change from the field