Assessing the ESG performance of your portfolio
What it is for
The ESG module measures the Environmental, Social and Governance performance of each of your properties, through assessment campaigns. It lets you identify your best-rated properties and those making the most progress, and build your ESG strategy — typically towards a label such as the French ISR, valid for three years.
The vocabulary of the module
| Term | What it is |
|---|---|
| Campaign | A name, a scope (the list of properties assessed) and a validity period. It is the central unit of the module. |
| Scoring grid | Your assessment system: the indicators and the form templates |
| Indicator | A question, with its theme, its weighting and its scored possible answers |
| Form template | A filter of indicators, so each respondent only gets the questions that concern them |
| Supporting document | The evidence behind an answer — an ISR auditor may require it |
Indicators are grouped into themes, themselves attached to three fixed domains: Environment, Social, Governance. Each level carries its own weighting.
A property's journey: four stages
Initialisation → Collection → Qualification → Publication
The campaign is finished when all its properties are published. You then create a new campaign for the following period.
Step by step
1. Create the campaign
Click "Create a new campaign" and give its name, its period and its scope. You land on the management page, which lists the properties and their progress.
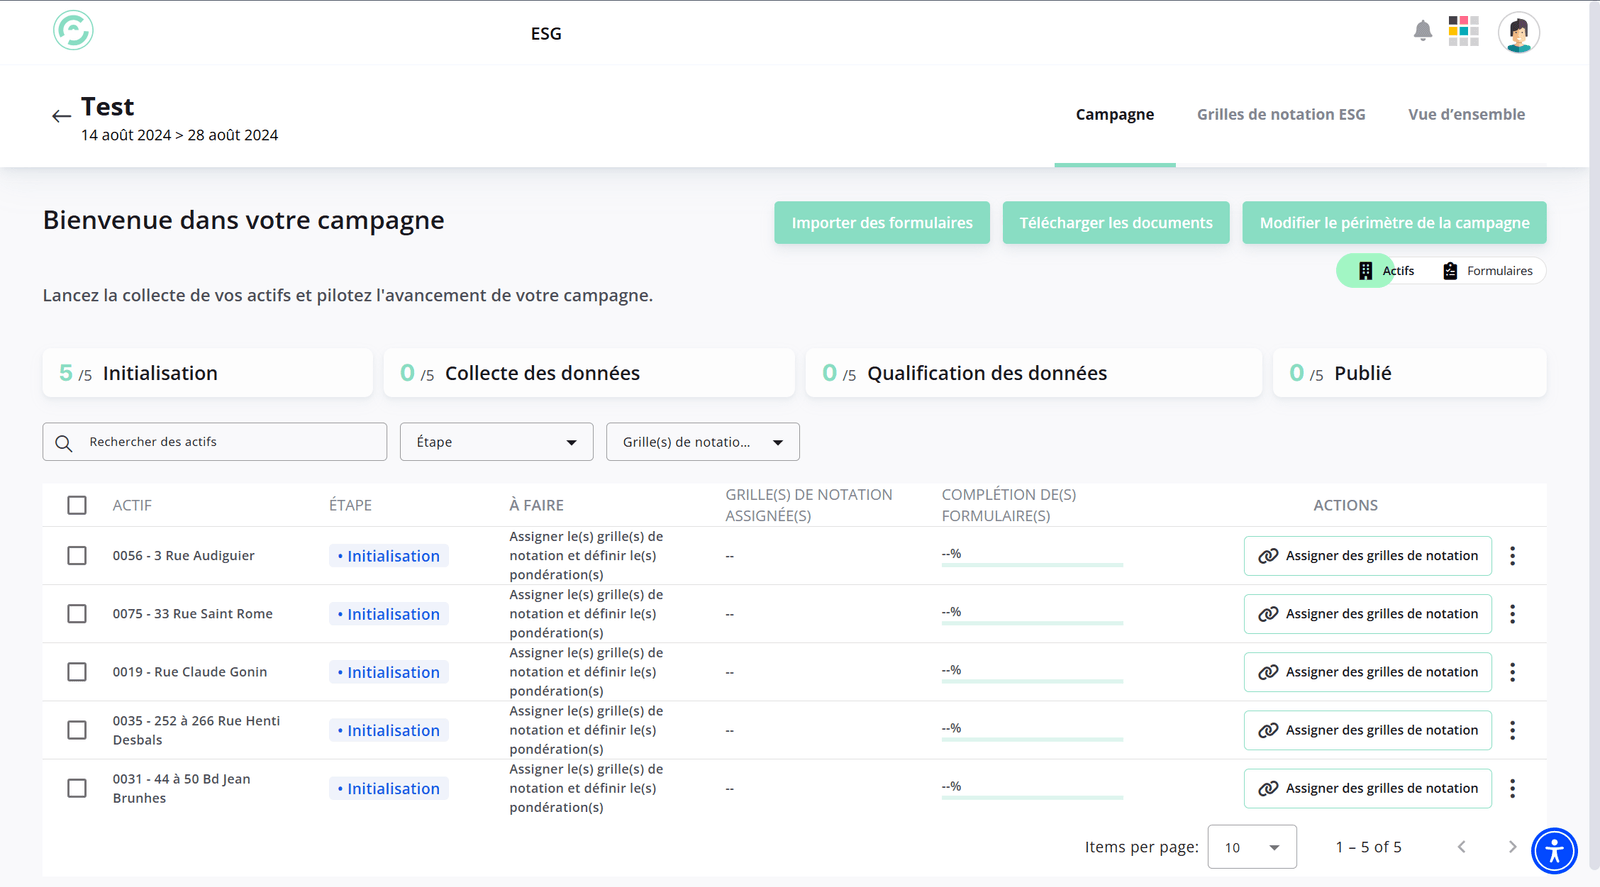
Four counters give you the campaign's progress, one per stage. The table lists your properties with, for each, its stage, what remains to do, the grids assigned and the completion rate of its forms.
2. Build the scoring grid
In the "ESG scoring grid" tab:
- Create the grid — empty, from a template, or from the grid of a previous campaign.
- "Manage domains" to set the weightings.
- "Add a theme", then "Add an indicator".
- For each indicator, define the possible answers and their score. Three answer forms: single choice, multiple choice, range.
- Create form templates if you need them.
- Click "Activate".
Once the grid is activated, you can no longer change its structure. The weightings do remain editable. Read the grid through before activating.
Then assign the grid to the properties: they move to Collection.
3. Collect the answers
Create the collection forms and send them to your stakeholders through a unique link. The respondent does not need to be a platform user: their link only gives access to their own form.
Close the collection to move to Qualification. Missing answers are then completed by hand.
4. Qualify
Open a property's form from the ⋯ menu. For each question you get the current answer, an optional target answer, a comments field, and the option to add a supporting document — strongly recommended.
Use "Check completion" to make sure nothing is missing. If two respondents contradict each other, it is for you to decide.
5. Publish
The "Publish" button becomes active once everything is complete.
No going back is possible. The frozen score becomes the property's ESG performance for this campaign.
How the score is calculated
The score is built by cascading weightings: answer → indicator → theme → domain → property.
- Each answer is worth a score from 0 to 10.
- A property's score is out of 100.
- Weightings must total 100% at every level — the platform checks this and stops you otherwise.
The target score is an objective for a future campaign: it has no effect on your current score.
Suggested answers: an indicator connected to a piece of platform data shows its current value as a suggestion. It is up to you to confirm or correct it — an unsaved suggestion is not counted.
Moving to the following year
You do not extend a campaign: you create a new one linked to the previous one, through the "Link to a previous campaign" field.
The link can only be established when creating the campaign. It carries over the grids, the scope and the assignments, and last year's answers pre-fill the forms.
Two things to know about the carry-over:
- It relies on the indicator's code. If you change the code, Stonal treats it as a new indicator and carries nothing over.
- Pre-filling only takes effect after you have opened and then saved the form in the new campaign.
Import and export
- Export a property's form to Excel, with current and target answers.
- Import forms in bulk from the campaign page: export the multi-property template, fill it in (
?for "I don't know",|to separate multiple choices), then upload it. Stonal runs a simulation and returns an error report without changing anything; you then confirm. Properties must be in Qualification. - Download the documents: a ZIP of all your supporting evidence.
See also
- General information for a property — the data behind suggested answers
- Benchmark — comparing your properties with each other